DTF transfers unlock vibrant, durable graphics on fabrics with a softness that feels almost printed by hand, even on stretchy textiles. Direct-to-film transfers combine full color with compatibility across many fabrics, making it a flexible option for beginners and pros alike. With practical DTF printing tips, this guide helps you choose films, inks, and underbases for reliable results, and it explains color reproduction across cotton, blends, and performance fabrics. We cover the essential steps—from pre-press and adhesive powders to DTF heat press settings—so you can master the technique with confidence in real-world projects. This is a step-by-step DTF tutorial designed to help you reproduce professional results and durable wear, whether you’re sizing one shirt or running a small batch.
This alternative view frames the method as a film-based printing technique that uses a printable transfer film with adhesive powder to bond vibrant images to fabrics. Other terms you might encounter include direct-to-film imaging, fabric-transfer printing, and heat-press graphics, all describing the same end result—durable, full-color designs. You’ll gain practical guidance on how to apply DTF transfers correctly by following a structured workflow—from design and printing to curing, alignment, and final heat pressing. The language here leans on related concepts such as film-based printing, adhesive application, and optimized pressing pressure to help you see the big picture. Viewed together with the step-by-step tutorial in the first paragraph, this overview supports readers seeking both a practical method and a semantic understanding of the technology.
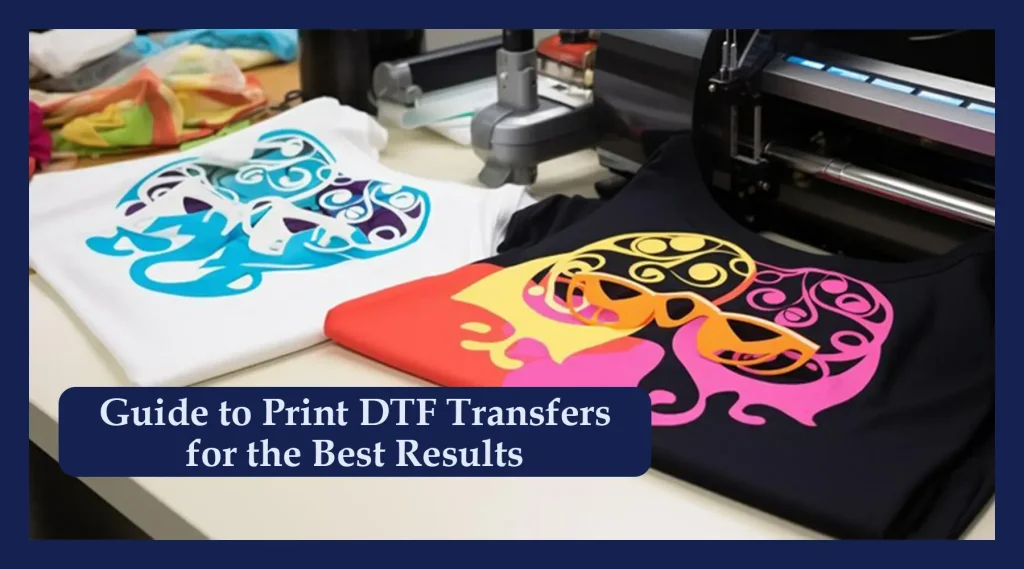
Understanding Direct-to-Film Transfers: Core Principles and Benefits
Direct-to-film transfers, or DTF transfers, involve printing artwork onto a specialized film, applying adhesive powder, curing the powder, and then transferring the image to fabric with a heat press. This workflow delivers vibrant color reproduction, sharp details, and a soft hand feel that remains comfortable on a wide range of textiles. By combining digital design with a reliable transfer method, DTF transfers offer flexibility and consistency for both small runs and custom projects.
The primary advantage of DTF transfers is their balance of color fidelity and versatility. Compared with traditional screen printing or iron-on methods, DTF supports full-color graphics, intricate gradients, and smooth edges on many fabric blends. This makes it a practical choice for beginners and seasoned crafters alike, especially when you want fast turnaround and easy customization. As you progress, you can refer to a step-by-step DTF tutorial to refine your technique and outcomes.
Setting Up Your DTF Workspace: Tools, Materials, and Practical Tips
A well-equipped DTF area starts with the essentials: a DTF printer or access to a reliable DTF printing service, DTF film, adhesive powder, a heat press with stable temperature control, and protective layers like silicone sheets or parchment paper. Don’t forget a weeding tool, lint-free cloths, gloves, and a pre-washed garment. A clean, well-lit workspace with a ruler or measuring scale helps you achieve precise alignment and consistent results.
To optimize your workflow, set up proper color management and calibration. Calibrating your printer and using ICC profiles tailored to your substrate improves color accuracy and reduces color shifts. This is a core aspect of DTF printing tips, ensuring your designs translate faithfully from screen to fabric. Having a dedicated space for pre-press checks, curing, and post-press inspection can dramatically improve repeatability and reduce troubleshooting later on.
Designing for DTF: Artwork, Color, and File Prep
Designing for DTF starts with high-resolution artwork and transparent backgrounds where appropriate. Prepare files with a clear understanding of color management, including white underbase considerations for dark fabrics. Using appropriate file formats and considering how colors will remap on fabric helps preserve detail in gradients and fine lines, which is crucial for direct-to-film transfers.
Once the artwork is ready, plan your print and production workflow, including a test run to verify opacity and color density on similar fabrics. Step-by-step planning and careful file preparation are essential components of a reliable process, and can be reinforced by following a step-by-step DTF tutorial that walks you through from design to print readiness and final transfer.
Step-by-Step Application: From Print to Transfer
This section walks through the core sequence: design and print, apply adhesive powder and cure, prepare the garment, align and secure, press, and cool. Understanding how to apply DTF transfers with the correct order and timing helps prevent errors and ghosting. Each step is designed to maximize color fidelity and adhesion while maintaining fabric integrity.
During pressing, set the DTF heat press to the manufacturer-recommended temperature and pressure, commonly around 320°F (160°C) with medium to firm pressure for 12–15 seconds. Depending on fabric type and transfer material, you may need to adjust slightly. After pressing, peel the PET film while warm (hot peel) unless your design specifies a cold peel. This nuanced process is a practical aspect of the overall step-by-step DTF tutorial and is often the difference between a flawless transfer and a compromised image.
Finishing, Curing, and Post-Press Care
Post-press handling begins with allowing the garment to cool on a flat surface. If additional topping or partial transfers are needed, re-position and re-press carefully to avoid over-pressing. Proper cooling helps set the adhesive and reduces distortion, promoting long-lasting results.
Care instructions are essential to extend life: turn the garment inside out, wash in cold or warm water on a gentle cycle, and avoid high-heat tumble drying. If ironing is required, avoid the printed area or use a protective barrier and iron on the reverse side. Following these care steps complements the durability of DTF transfers and preserves color vibrancy over time.
Troubleshooting and Quality Control for Consistent DTF Results
Common issues include fading colors, cracking at edges, ghosting, or peeling after washing. Root causes often involve incomplete powder curing, improper transfer temperature or time, or uneven transfer adhesion. By systematically auditing each stage—printing, powder application, curing, pre-press, alignment, and pressing—you can pinpoint where adjustments are needed and improve outcomes.
Implementing a QA checklist and frequent small test runs helps you maintain consistency as you scale. Document settings for different fabrics, track cure times, and keep notes on peel type and pressure. These practices, combined with ongoing DTF printing tips and adherence to manufacturer guidelines, will support reliable, high-quality transfers that meet expectations and reduce rework.
Frequently Asked Questions
What are the key benefits of using direct-to-film transfers (DTF transfers) for apparel?
DTF transfers deliver vibrant color, crisp details, and a soft hand feel on a wide range of fabrics. They’re cost-effective for small batches and easy to customize, with strong compatibility across textiles. For best results, apply practical DTF printing tips such as using quality film and adhesive powder, proper curing, and a controlled heat press workflow.
Which fabrics are best for DTF transfers and how should I prep them?
Choose smooth, tightly woven fabrics like cotton and cotton blends. Pre-wash and fully dry the garment, then pre-press to remove moisture. Use a reliable DTF heat press with stable temperature and even pressure (around 320°F as a guideline) and perform a fabric test to gauge opacity and adhesion, following DTF transfers best practices.
What is the step-by-step DTF tutorial for applying DTF transfers with a heat press?
Here’s a concise step-by-step guide: 1) design and print with a white underbase if needed; 2) apply adhesive powder and cure thoroughly; 3) pre-press the garment to remove moisture; 4) align and secure the transfer; 5) press at the recommended temperature and time with medium to firm pressure (around 320°F for 12–15 seconds); 6) peel the film while warm if using a hot-peel approach; 7) allow to cool and re-press if necessary. Follow manufacturer guidelines for best results with your DTF heat press.
What are common mistakes when applying DTF transfers and how can I avoid them?
Common mistakes include insufficient powder curing, incorrect temperature/time or pressure on the DTF heat press, misalignment, and over- or under-pressing. Avoid them by ensuring even powder application and proper curing, calibrating your heat press, testing on scrap fabric, securing the transfer with tape, pre-pressing the garment, and strictly following product guidelines for best adhesion.
How long do DTF transfers last and how should I care for them?
With proper care, DTF transfers can endure many washes. Turn the garment inside out, wash in cold or warm water on a gentle cycle, and avoid high-heat tumble drying. Air-dry when possible, or use a low-heat setting. Do not iron directly over the printed area; if ironing is needed, use a protective barrier and iron on the reverse side.
How can I troubleshoot issues with DTF transfers such as peeling or fading?
If you notice fading, peeling, or ghosting, re-check powder curing and adhesion, verify heat press temperature and time, and confirm garment prep accuracy. Re-test on a sample and adjust heat, time, and pressure as needed. Ensure you follow the correct peel method (hot peel or cold peel) as specified for your film and ink combo.
| Topic | Summary |
|---|---|
| What are DTF transfers? | DTF transfers involve printing artwork onto a film, applying adhesive powder, curing, and transferring the image to fabric with a heat press. They offer vivid color reproduction, crisp details, and a soft hand feel, with wide fabric compatibility; they’re cost-effective for small batches and easy to customize. |
| Materials and setup you’ll need | DTF printer or access to DTF printing services; DTF film and adhesive powder; heat press with stable temperature control; silicone sheets or parchment; weeding tool, lint-free cloth, gloves; pre-washed garments; alignment tools; fabrics that are smooth and tightly woven (cotton and blends are common) |
| Understanding the process | DTF blends digital design with a heat-press workflow, delivering color vibrancy, detail retention, and a soft hand after transfer; the guide covers the full workflow from design to final wash to ensure great results. |
| Step-by-step overview | A seven-step workflow from designing and printing to curing, preparing the garment, aligning, pressing, post-press adjustments, and care—with emphasis on proper settings and testing. |
| Pressing parameters and peeling | Typical temperature around 320°F (160°C) with medium–firm pressure for 12–15 seconds. Follow manufacturer guidelines for exact temps. Peel approach is usually hot-peel unless specified otherwise. |
| Post-press and care | Cool briefly, re-press if needed with caution, and allow full cooling. Wash inside-out in cold/warm water on gentle cycle; air-dry or low heat; do not iron directly on printed area. |
| Troubleshooting & best practices | Fading/dull prints, cracking, ghosting, or peeling can result from improper curing, temperature, or adhesion. Solutions include adjusting curing time/temperature, verifying pressure, ensuring even powder application, and re-testing on similar fabrics. |
| Optimization tips | Use high-quality film and powder; calibrate printers and use ICC profiles; run small test pieces to dial in heat, time, and pressure; ensure temperature stability; choose fabrics wisely (light colors for brightness, pre-treat darks as needed). |
| FAQs | Can DTF transfers work on polyester or blends? Yes, but adjust heat/time per film guidelines. Do you need a special printer? A standard printer can work with the film if using compatible inks; many users opt for dedicated DTF printers or trusted service providers. How long do transfers last? With proper care, they can endure many washes, depending on fabric, heat settings, and care. |

